Category: Wasabi

How to Recover Data From Wasabi Cloud Storage with DPX vPlus

Introduction

DPX vPlus is a reliable backup and snapshot management solution that offers seamless data recovery for virtual environments and Microsoft 365. In a previous blog, we provided the steps for How To Use Wasabi Hot Cloud Storage for DPX vPlus Backup Storage. In this step-by-step guide, we will walk you through the process of recovering data from Wasabi Cloud Storage using DPX vPlus. Whether you need to recover virtual machines or Microsoft 365 resources, this guide has got you covered. Let’s get started! 

Note: This guide assumes that you have already backed up your data to Wasabi cloud storage and have properly configured DPX vPlus.

Ad-Hoc Recovery of Virtual Machines from Wasabi Cloud Storage

  • Open DPX vPlus Dashboard
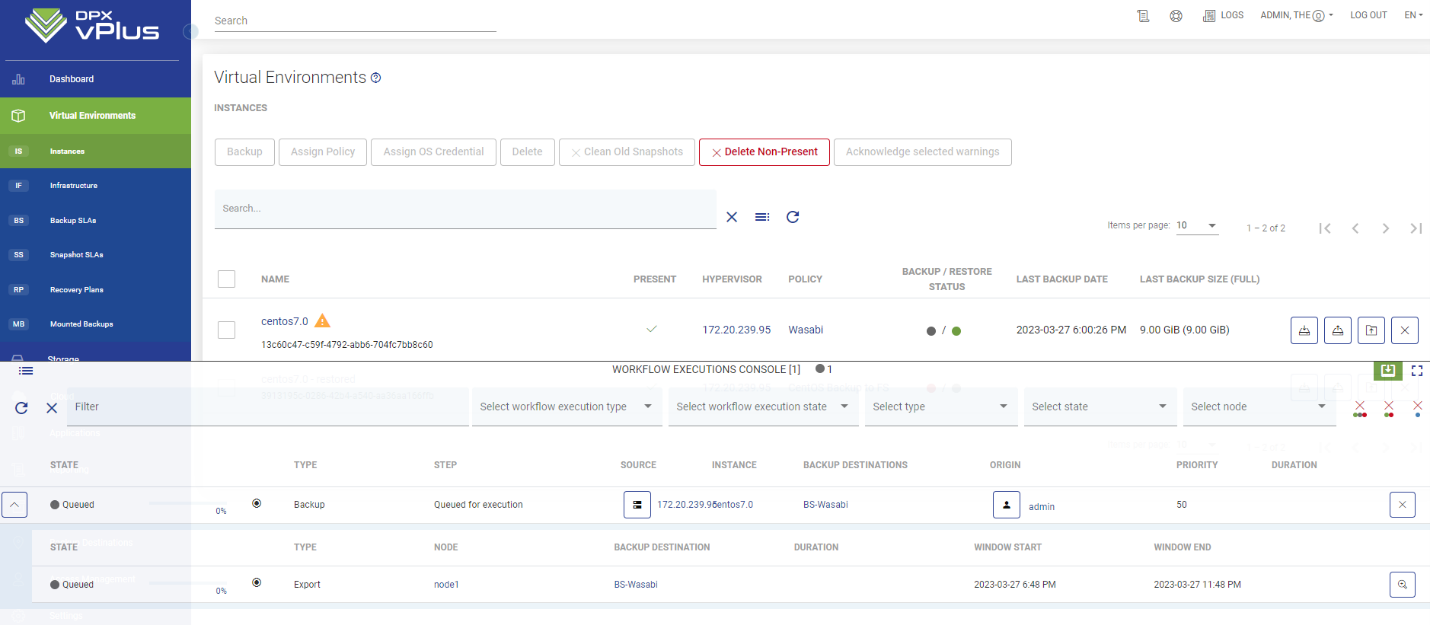
    1.  On the left-hand menu, click on “Virtual Environments” and then “Instances” to access the list of discovered virtual machines.
    2.  Scroll or use the search bar to find the specific VM you want to recover.
  • Initiate the Restore Job:
    1.  Click the second button from the right to open the Restore job creation wizard.
  • Select the Snapshot:
    1.   In the Restore Job wizard, choose the snapshot that you wish to recover.
    2.   Look for the snapshot ending with the destination that indicates it is stored in Wasabi object storage.
  • Specify the Recovery Destination:
    1.   Select “Restore to Hypervisor” and choose the hypervisor host where you want to recover the VM.
  • Configure the Restore Options:
    1.   Complete the restore wizard, following the specific process for your hypervisor.
    2.   Depending on your requirements, you may have options to delete the existing VM or change the name of the new VM.
  • Start the Restore Task:
    1.   Click “Restore” to initiate the task.
    2.   Monitor the progress by accessing the “Workflow Executions Console” at the bottom of the screen.

Ad-Hoc Recovery of Microsoft 365 Resources from Wasabi Cloud Storage

  • Open DPX vPlus Dashboard:
    1.  On the left-hand menu, click on “Cloud” and then “Instances” to view the list of Microsoft 365 resources.
  • Locate the Owner of the Resource:
    1.  Scroll or use the search bar to find the owner of the resource you need to recover.
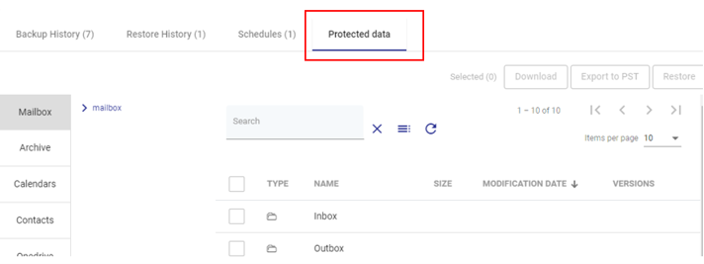
  • Access Protected Data:
    1.  Click on the name of the owner to open a new window.
    2.  Scroll down until you find the “Protected Data” tab and open it.
  • Select the Application:
    1.  On the left side, you will see tabs for each MS application protected for that user (e.g., Exchange, OneDrive, Chats).
    2.  Browse through the tabs to find the specific application that contains the resource you want to recover.
  • Choose the Restore Option:
    1.  Browse through the application (e.g., OneDrive, Mailbox) to find the individual resource you need to recover.
    2.  Select the item you want to restore.
  • Restore the Item:
    1.  To restore the item back to a location within MS 365 cloud, click the “Restore” button in the top-right corner.
    2.  This will open a short Restore wizard where you can specify alternate restoration paths, overwrite existing files, or choose an alternate User, Group, Team, or Site for restoration.
    3.  Alternatively, to download the item to your local machine, click the “Download” button in the top-right corner.
    4.  Once the download preparation is complete, you can find the item for download under the “Download” section in the “Cloud” tab of the left-hand menu.

Scheduled Recovery Using Recovery Plans

  • Open DPX vPlus Dashboard:
    1.  On the left-hand menu, click on “Virtual Environments” and then “Recovery Plans.”
    2.  Click the “Create” button on the right-hand side to create a new Recovery Plan.
  • Create the Recovery Plan:
    1.  Give the new Recovery Plan a descriptive name and click “Save”.
    2.  Rules can be added to this plan later.
  • Add a Rule:
    1.  Scroll down and click “Add Rule” to schedule a recurring restore.
  • Configure the Rule:
    1.  Provide a name for the rule and click “Next”.
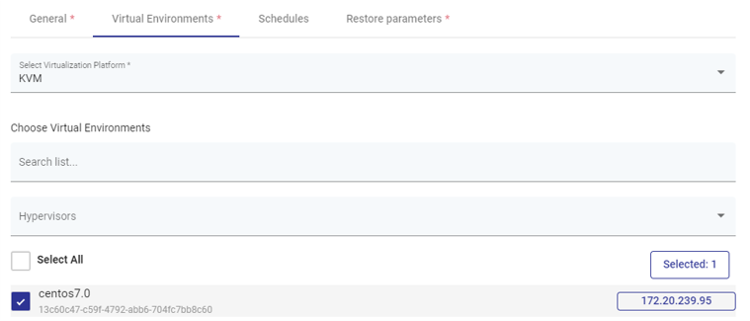
    2.  Select the Virtualization Platform and the VM(s) you want to include in this plan.
    3.  Click “Next”.
  • Select or Create the Schedule:
    1.  Choose an existing schedule or create a new one that suits your recovery plan.
    2.  Click “Next”.
  • Define Restore Parameters:
    1.  Proceed through the “Restore Parameters” section, specifying details such as the backup to use for recovery, recovery destination, storage, and the name for the new VM.
    2.  Once done, click “Save”.
Conclusion

With DPX vPlus and Wasabi Cloud Storage, recovering data from backups has never been easier. In this guide, we covered the step-by-step process for ad-hoc recovery of virtual machines and Microsoft 365 resources. Additionally, we explored scheduled recovery plans to automate recurring restores. By following these instructions, you can confidently recover your valuable data using DPX vPlus and Wasabi Cloud Storage. Contact us for a demonstration, trial and pricing.

Read More
06/19/2023 0 Comments

Microsoft 365 Backup to Wasabi Hot Cloud Storage 

As businesses increasingly adopt Microsoft 365 services and applications, it’s essential to use cost-effective, fast, and reliable data backup solutions. While many assume that Microsoft 365 has built-in data protection, it’s important to remember that data protection is always the responsibility of your company, especially when it comes to meeting traditional backup, regulatory, and compliance policies. That’s where Catalogic DPX vPlus for Microsoft 365 comes in to provide a comprehensive Microsoft 365 backup solution. 

DPX vPlus provides continuous protection for critical business data in Microsoft 365, including file versioning and optional compression and deduplication. With DPX vPlus, businesses get the whole package of necessary tools to backup and recover Microsoft cloud application and services data, including Exchange Online, SharePoint Online, OneDrive for Business, and Microsoft Teams. With granular and point-in-time restore options, flexible retention and backup schedules, and automatic protection of new users, DPX vPlus makes it easy to backup and recover Microsoft 365 backup data. 

But what about software and storage costs? That’s where this joint solution shines. DPX vPlus for Microsoft 365 with Wasabi Hot Cloud Storage offers the least expensive backup solution to lower your costs for backing up your Microsoft 365 data. DPX vPlus for Microsoft 365 is a comprehensive data protection solution for businesses that need to backup and recover their critical data. With granular and point-in-time restore options, flexible retention and backup schedules, and automatic protection of new users, DPX vPlus makes it easy to backup and recover Microsoft 365 backup data.  

With Wasabi Hot Cloud Storage, businesses can store their backups off-site in a fast, affordable, and secure way. Wasabi’s simple pricing model with no hidden fees means that businesses only pay for the cloud storage they use, making it the perfect solution for cost-conscious businesses.  

In conclusion, DPX vPlus for Microsoft 365 and Wasabi as a cloud storage provider offer the least expensive joint solution to lower your cost for Microsoft 365 backup. With the comprehensive data protection features of DPX vPlus and Wasabi’s affordable and secure cloud storage, businesses can backup and recover their critical data without breaking the bank. 

Resources for further learning:

Datasheet: Catalogic DPX vPlus for Microsoft 365

Demonstration videoVideo for DPX vPlus for Microsoft 365

Setup Guide: How To Use Wasabi Hot Cloud Storage for DPX vPlus Backup Storage 


Read More
05/25/2023 0 Comments

How To Use Wasabi Hot Cloud Storage for DPX vPlus Backup Storage

DPX vPlus is an enterprise-ready, agentless backup and snapshot management solution for Microsoft 365 and virtual environments. It allows you to reliably improve and automate backup performance, automate recovery tests, and significantly save resources, time, and money. Microsoft 365 backups and virtual machines backups can be stored on-premises, on a local file system or share, or can be stored in the cloud using cloud storage. Wasabi backup storage delivers fast to write, low cost, and reliable cloud object storage, that also provides faster speeds than Amazon S3. Wasabi backup storage charges no egress fees, and provides 100% data immutability, so you can be confident that your backup data is tamper-proof. 

This article provides the steps to use Wasabi cloud storage as DPX vPlus backup storage.  

Configuration Pre-Requisites 

  • DPX vPlus version 5.0 or higher 
  • Active Wasabi account with access to Wasabi console

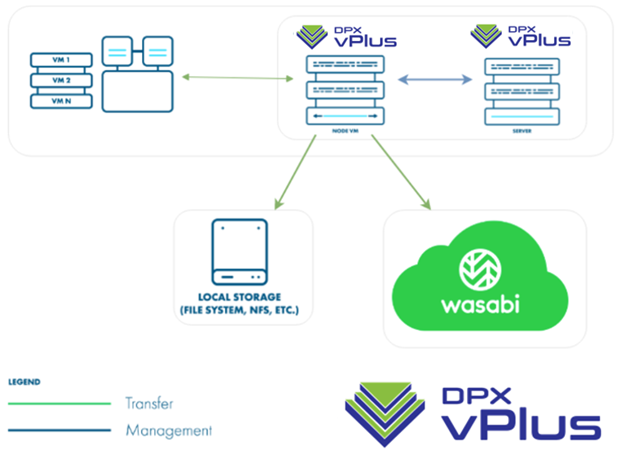
Reference Architecture Diagram 

Wasabi Configuration 

1. Login to Wasabi console and Click on “Create Bucket” to create a new standard bucket. Please refer to Creating a Wasabi bucket for information to create a bucket. 

2. Create an Access key and Secret key for the root user. Make sure to download the key file in order to retrieve your secret key again. 

DPX vPlus Configuration

Follow the below steps to configure DPX vPlus to use Wasabi backup storage: 

1. Log in to the DPX vPlus web UI 

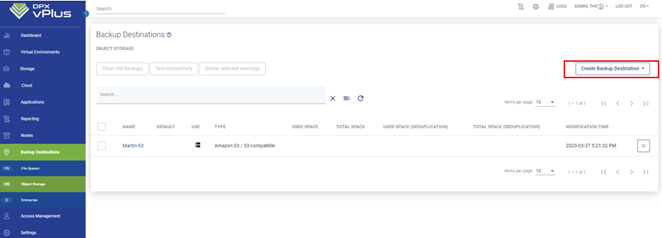
2. Navigate to the Backup Destinations Tab -> Object Storage. Then click on “Create Backup Destination” and select “Amazon S3 / S3-compatible.”

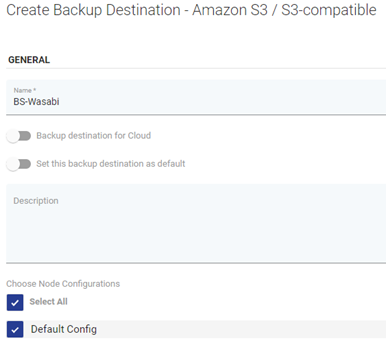
3. In the Create Backup Destination window, input the name for your backup destination and choose the node configurations as needed.

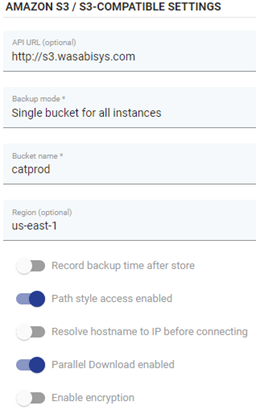
4. In Amazon S3 / S3-Compatible Settings, provide the information about your bucket 

Make sure the flags “Path style access enabled” and “Parallel Download enabled” are enabled. 

5. Input the Access key and Secret key and then click “Save” to save the configuration. 

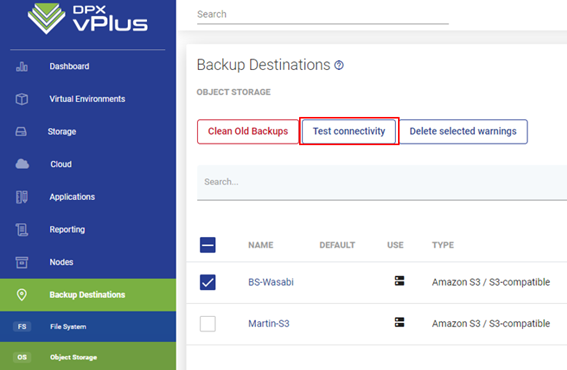
6. Test the connectivity by selecting the Wasabi destination and clicking “Test Connectivity.

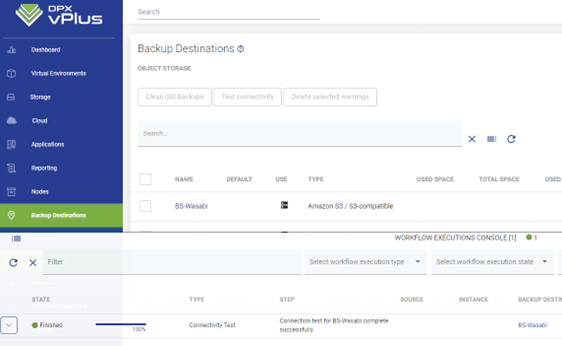
7. The results can be viewed in the Task Console.

8. Click on Virtual Environments and then Backup SLA’s to create a Backup SLA and protect your Virtual Environments, Containers, Microsoft 365 and Applications using Wasabi backup storage. Configure the settings under “General” tab.  

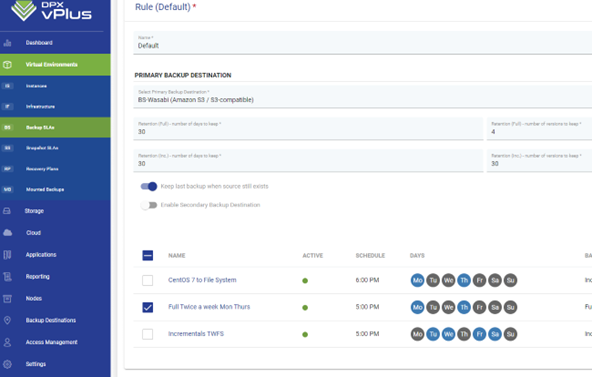
9. Configure Settings under the Rule tab. Select the Wasabi cloud storage as the destination, define the retention settings, and assign the policy to a schedule. If you have not yet created a schedule, you can assign this policy to a schedule at a later time.

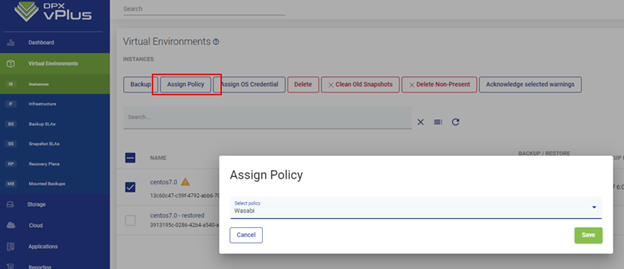
10. If you do not assign the policy to Virtual Machines during creation or want to assign new VMs to an existing Backup Policy, you can do so by clicking on “Virtual Environments” and then “instances.” Select the instance and click “Assign policy” and then select the policy created in step 4.8 above. Click “Save” to save the policy assignment. 

11. Start a backup by selecting the instance and clicking the backup icon.

12. The progress of the backup can be viewed on the task console. 

For any support or setup questions, please get in touch with Catalogic Technical Support at dpsupport@catalogicsoftware.com.

Read More
04/28/2023 0 Comments